How to Use LoRA with FLUX AI: A Comprehensive Guide

Discover How to Use LoRA with FLUX AI for groundbreaking art! Master AI tools for stunning visuals & real-time feedback. Start now!

1000+ Pre-built AI Apps for Any Use Case

How to Use LoRA with FLUX AI: A Comprehensive Guide

Start for free
Contents

FLUX AI has revolutionized AI image generation, offering hyper-realistic results that often surpass popular alternatives. By combining FLUX with LoRA (Low-Rank Adaptation) models, artists and enthusiasts can unlock an even broader range of creative possibilities. This comprehensive guide will walk you through the process of using LoRA with FLUX AI, providing detailed instructions, links to essential resources, and best practices.

Suppose you don’t want to go through all these processes and want to use FLUX AI right away. Well, there is an alternate solution for you. Anakin AI offers FLUX AI for free. They offer all the FLUX models including FLUX Pro, FLUX Realism LoRA, and FLUX.1 Schnell. Please go check them out.
FLUX AI Image Generator | Anakin
Better than Midjourney and Stable Diffusion, Try the Open Source, State-of-the-art image generation Tool: FLUX Pro Online!
FLUX Realism LoRA Online | Anakin
Elevate your AI-generated images with unparalleled photorealism using FLUX Realism LoRA.
FLUX.1-schnell | Free AI tool | Anakin
Flux Schnell is a fast, open-source text-to-image model designed for efficient image generation, offering high-quality outputs with minimal computational resources.

Understanding LoRA and FLUX

LoRA, or Low-Rank Adaptation, is a technique that allows for fine-tuning of large language models without the need to retrain the entire model. When applied to FLUX AI, LoRA models can modify the base FLUX checkpoint to achieve specific styles, characters, or artistic effects.FLUX AI, developed by Stability AI, is known for its ability to generate highly detailed and realistic images. By integrating LoRA models, users can enhance FLUX’s capabilities and tailor its output to their specific needs.

Software Setup

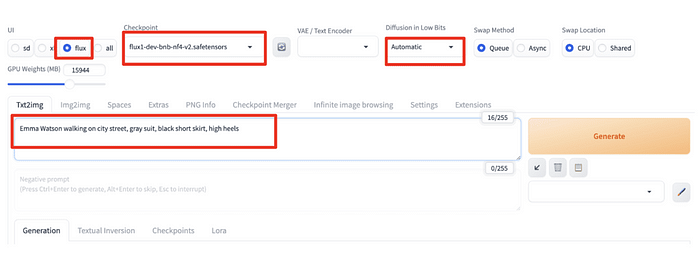
To use LoRA with FLUX AI, you’ll need to set up the appropriate software environment:

  1. Install SD Forge WebUI, which offers excellent support for FLUX AI models and LoRAs.
    Download: https://github.com/lllyasviel/stable-diffusion-webui-forge
  2. Download FLUX AI model:
    https://huggingface.co/lllyasviel/flux1-dev-bnb-nf4/tree/main
  3. Download FLUX VAE:
    https://huggingface.co/black-forest-labs/FLUX.1-schnell/tree/main
  4. For easier management of Stable Diffusion installations, consider using StabilityMatrix:
    https://github.com/LykosAI/StabilityMatrix
  5. You may need 7-Zip for extracting files:
    https://www.7-zip.org/download.html

Ensure you have a compatible GPU with at least 8GB of VRAM (16GB or more is recommended for optimal performance).

Detailed Steps for Using LoRA Models with FLUX AI

Step 1: Obtaining LoRA Models

  1. Visit Civitai: https://civitai.com/
  2. Use the search filters to find FLUX-compatible LoRA models.
  3. Look for LoRAs tagged with “FLUX” or mentioned in the description as compatible with FLUX AI.
  4. Download your chosen LoRA models. They typically come as .safetensors or .pt files.

Step 2: Installing LoRA Models

  1. Locate your SD Forge WebUI installation directory.
  2. Navigate to the “webui/models/Lora” folder.
  3. Create a new subfolder named “Flux” for better organization.
  4. Place the downloaded LoRA files into this “Flux” subfolder.

Step 3: Generating Images with LoRA in Forge WebUI

  1. Launch SD Forge WebUI and navigate to the “Stable Diffusion” tab.
  2. In the “Checkpoint” dropdown, select the FLUX checkpoint (preferably flux1-dev for best quality).
  3. Go to the “LoRA” section of the interface.
  4. Click on “Add LoRA” and select the LoRA model you want to use from the dropdown list.
  5. Adjust the LoRA weight slider (typically between 0.5 and 1.0 for best results).
  6. In the prompt box, add your desired text prompt. Include the LoRA trigger word if specified in the LoRA’s documentation.
  7. Set your desired image dimensions, sampling method, and steps.
  8. Click “Generate” to create your image with the LoRA applied.

Advanced LoRA Usage Techniques

Combining Multiple LoRAs

  1. Add multiple LoRAs in the LoRA section of the WebUI.
  2. Adjust the weights for each LoRA to balance their effects.
  3. Experiment with different combinations to achieve unique styles.

Using LoRA with Negative Prompts

  1. In the “Negative prompt” box, add descriptions of elements you want to avoid.
  2. You can use LoRA models in negative prompts by adding them with negative weights.

Fine-tuning LoRA Effects

  1. Experiment with different LoRA weights to adjust the strength of the effect.
  2. Use the “CFG Scale” slider to control how closely the image adheres to your prompt.
  3. Try different sampling methods (like Euler a, DPM++ 2M Karras) to see which works best with your chosen LoRA.

Popular FLUX LoRAs and Their Uses

You can find these and other FLUX-compatible LoRAs on Civitai: https://civitai.com/

  1. Flux Disney: Ideal for creating Disney-style animated characters.
  • Trigger word: “flux_disney”
  • Recommended weight: 0.7–0.9

2. Flux Realism: Enhances the already impressive realism of FLUX.

  • Trigger word: “flux_realism”
  • Recommended weight: 0.6–0.8

3. Flux Yarn Art: Creates a unique textured, handcrafted look.

  • Trigger word: “flux_yarn”
  • Recommended weight: 0.8–1.0

4. Flux Aquarell Watercolor: Produces beautiful watercolor-style images.

  • Trigger word: “flux_watercolor”
  • Recommended weight: 0.7–0.9

Prompting Techniques for FLUX and LoRA

  1. Start with a clear subject description: Begin by clearly defining the main subject of your image.
  2. Add details about style, lighting, and composition: Specify artistic styles, lighting conditions, and desired composition for more refined outputs.
  3. Include the LoRA trigger word if specified: Ensure the correct LoRA trigger word is included in your prompt to activate the model.
  4. Use artistic terms to guide the style: Terms like "impressionist" or "photorealistic" help steer the model toward a specific artistic style.

Example prompt:
“A hyper-realistic portrait of a young woman, flux_realism, wearing a vintage floral dress, soft smile, standing in a sunlit garden, depth of field, professional photography.”


Troubleshooting Common Issues

LoRA not affecting the image:

  • Verify that the LoRA is properly loaded in the WebUI.
  • Try increasing the LoRA weight.
  • Ensure you're using the correct trigger word in the prompt.

Out of memory errors:

  • Lower the image resolution or reduce the batch count.
  • Switch to half-precision mode (fp16) to save memory.
  • Close other memory-heavy applications running in the background.

Unexpected results:

  • Look for conflicting elements in your prompt that may confuse the model.
  • Adjust the CFG (Classifier-Free Guidance) scale for better control over the output.
  • Experiment with different sampling methods to fine-tune the generated image.

Training Your Own FLUX LoRA

For advanced users interested in creating custom LoRAs:

  1. Prepare a dataset of 15–30 high-quality images representing your desired style or subject.
  2. Create corresponding text files with detailed descriptions for each image.
  3. Use the kohya_ss GitHub repository for LoRA training scripts:
    https://github.com/bmaltais/kohya_ss
  4. Edit the configuration file to specify your dataset folder, learning rate, and training steps.
  5. Run the training script and monitor the loss values to prevent overfitting.

For Mac users setting up the training environment:

Best Practices for LoRA Training and Usage

  • Use a diverse dataset to create versatile LoRAs.
  • For character LoRAs, incorporate a variety of poses, expressions, and outfits.
  • Start with a lower learning rate (e.g., 1e-4) and increase it as needed.
  • Test your LoRA with different weights and prompts to fully understand its capabilities.
  • Share your LoRA with the community and gather feedback for improvements.

By mastering LoRA models with FLUX AI, you can expand the boundaries of AI-generated art. Whether your goal is ultra-realism, stylized illustrations, or unique artistic effects, the combination of FLUX and LoRA offers a powerful toolkit to bring your creative visions to life. Experiment, explore, and enjoy the limitless possibilities this technology provides.

Always download software from official sources and be cautious when installing third-party tools. Additionally, ensure that your system meets the minimum requirements, especially for GPU capabilities, to run AI image generation effectively.